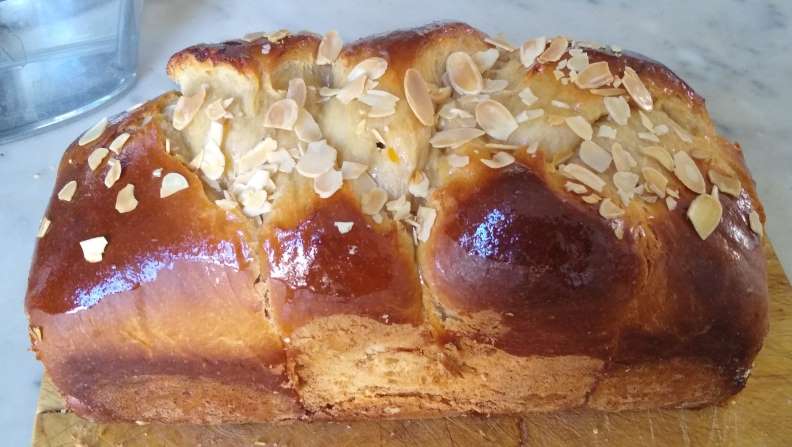
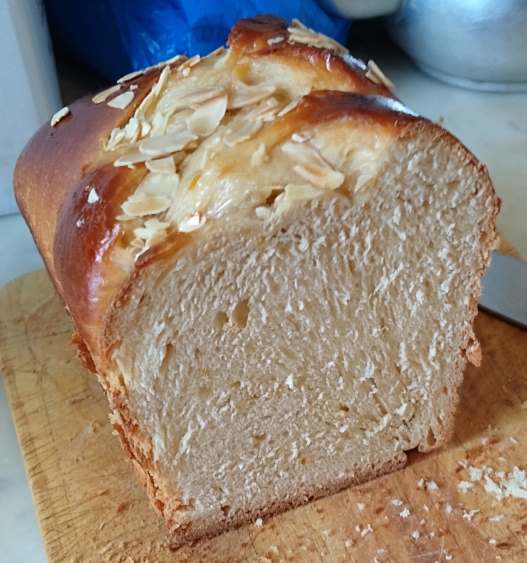
As I had posted in reply to cfraenkel, this Easter I tried to make a Greek sweet Easter bread that has eluded me so far in terms of a successful bake.
They haven't been a disaster, but also not what I had tried and liked so much.
It has a very particular flavor thanks to a combination of ground cherry seed powder (mahleb) and ground up dry mastic resin. It also has a very characteristic texture/crumb, more stretchy, chewy, and moist rather than with big bubbles and airy.
After substantial research online, even from Greek YouTube videos/sites, I decided to try a yeasted poolish recipe I cobbled together from a variety of different sources.
Two key insights I tried to incorporate in the bake that were new and I felt might provide that missing something from the previous attempts:
- Build the dough up in successive stages going from more to less liquid, at each stage of the process
- Bake in a reducing temperature oven
The recipe for one loaf was as follows:
Poolish: 100g milk mixed with 100g strong white flour, 5g of sugar, and commercial yeast according to how long the poolish can be left to fully ferment. I had a timeframe of about 3h, so used 1g of active yeast powder. For fresh compressed yeast that would be 2g.
Once the poolish has doubled in size and is very active (after about 3h), I combined it with the ingredients for the intermediate dough, which was as follows:
250g (of a final total of 300g) of strong white flour, 2eggs, 100g of sugar, a pea size piece of the dried mastic ground up with a mortar and pestle with a little of the sugar and mahleb powder, some orange zest (optional) and 40g of soft butter cut into small pieces.
I mixed the poolish, flour, sugar, eggs, and spices first, let it fully hydrate, and then mixed in the soft butter.
The resulting sticky and high hydration dough was then left to again at least double in size. (it took me about 4-5h). Some recipes also add a little more yeast at this stage to get it all moving faster, but I chose to take a slower less yeasted approach.
Once the intermediate dough is fermenting strongly and doubled in size, it is time to combine with the remaining flour in order to produce a much firmer dough that is easy to handle. I started mixing in a little at a time with dough whisk and once it was firm enough to kneed, I then proceeded by hand. As soon as it has reached this stage, I continued adding a little flour at a time, until I had a dough that was just firm enough to not stick too the kneading surface. I found that this was pretty much exactly at the 300g total without counting the flour in the poolish.
With my first bake (picture bellow), I then left the resulting final dough to bulk ferment until I got a descent poke test, but what I found was that by then, it was too slack to be able to shape/braid easily and then also hold its shape, so I put the resulting loaf in a baking tin and let it ferment till almost double in size and then baked in a 'falling' oven. So heat to 200C with fan, change to 200C bottom only for 10min once the tin was in, then reduce to 180C bottom and top for 10min, and finish, at 160C for 10min, again bottom and top. The top of the loaf was brushed with eggwash before putting it in the oven and topped with almond slivers.


The second bake (pictured at the top of the post), was pretty much the same, but what I did instead was not bulk ferment the final firm dough, but proceed to braiding straight after it had relaxed for about 30min from the kneading.
The shaping takes the following process: cut the final dough into 3 using the dough scraper. It's important to weigh and make sure they are as equal weight as possible. Flatten out, either by hand or using a rolling pin, and then roll up into a kind of sausage shape. Do the same with the other lumps of dough. Then, starting with the first one, roll it out by hand into a kind of long thin snake shape and then do the same with the other two, making sure they are as similar length and thickness.
With the 2nd bake, once I made the 3 dough lengths and braided them into a loaf, I left the resulting loaf on a baking tray lined with baking paper and covered with a wet towel for about 6h to rise ahead of the bake.
Once the loaf seemed to be nice and plump, but not too soft (it is important not too let it ferment too much as it becomes like brioche/cake and not chewy/stringy) , it is time to bake. I found the poke test not really much use, just the plumpness of the braids. I started the oven heating up to 200C with fan, and then did the first eggwash. I then did one more before putting it in, sprinkling, the 2nd time with sugar and the almond slivers. Put it in and switched to 200C bottom only for 10min, then 180C for 10min top and bottom, and finished with 160C top and bottom.
The 1st bake was OK, the crumb was not bad, but it was too much like a brioche/cake rather than the more chewy tsoureki. The shaping/bradding was problematic, and making it in a tin, while a good emergency measure, took away the nice look of the stand-alone loaf.
The 2nd bake, was almost right. Going directly from final dough to shaping without bf really worked well. The baking is where the final tweak is needed. Warming the oven to 200C was OK, but probably should have then reduced to 180C for the 10min bottom only stage, and then moved a shelf up for the two top and bottom stages but at 160C and 140C respectively.
I'll provide updates as to how these last tweaks worked out.